
In manufacturing, accurate documentation is critical. Every shift produces inspection reports, work orders, safety checklists, maintenance logs, compliance reports, and production summaries.
- I What You’ll Build
-
II
Step-by-Step: Automate Manufacturing Reports with Active Merge Workflows
- II.I Step 1: Create an Active Merge Account
- II.II Step 2: Prepare Your Data in Google Sheets
- II.III Step 3: Build Your Templates in Word or Google Docs
- II.IV Step 4: Upload Templates to Active Merge
- II.V Step 5: Build a Multi-Document Workflow
- II.VI Step 6: Connect Your Data Source and Finalize Field Mapping
- II.VII Step 7: Preview and Generate All Documents
- II.VIII Step 8: Automate Delivery & Storage
- III Final Thoughts
Manually creating these documents wastes time, introduces errors, and leads to inconsistent formatting—frustrating supervisors and compliance officers.
ActiveMerge automates this process. With its Workflows feature, your team can generate multiple document types at once, pulling data from Google Sheets or your MES/ERP system into reusable templates. Polished, branded PDFs are produced instantly.
Instead of juggling dozens of repetitive files, your team gets accurate reports in seconds, stored and delivered automatically—saving time and reducing errors across your operations.
What You’ll Build
By following this guide, your manufacturing team will set up an automation system that creates:
- A library of branded manufacturing templates (Inspection Reports, Work Orders, Safety Reports, Maintenance Logs).
- An Active Merge Workflow that generates multiple documents at once, reducing repetitive work and paperwork errors.
- Automated delivery and storage in Google Drive, Dropbox, or OneDrive, plus notifications for supervisors and compliance teams.
This process ensures every inspection, work order, or compliance document is fast, accurate, and consistently formatted.
Step-by-Step: Automate Manufacturing Reports with Active Merge Workflows
This tutorial walks you through creating automated bulk manufacturing reports using Active Merge. From account setup to multi-document workflows and delivery automation, each step is explained in detail.
Step 1: Create an Active Merge Account
Purpose: Establish your workspace, templates, and integration options.
- Go to Active Merge Registration and sign up using your work email.
- Inside the dashboard, you’ll find three key sections:
- Templates – Upload and manage all your manufacturing templates (inspection reports, work orders, etc.).
- Workflows / Document Generation – Build workflows that generate multiple reports at once.
- Integrations – Connect Google Drive, OneDrive, Dropbox, or pull data from Google Sheets, MES, or ERP.

Step 2: Prepare Your Data in Google Sheets
Purpose: Centralize your inspection, batch, or maintenance data for merging into reports.
Example Google Sheet:
| BatchID | MachineID | InspectorName | InspectionDate | IssuesFound | Work Order ID | Supervisor | Next Service Date |
| B-1021 | M-44 | James Tan | 2025-09-01 | None | WO-212 | Maria Chen | 2025-10-01 |
| B-1022 | M-45 | Ravi Kumar | 2025-09-01 | Oil leak | WO-213 | David Lee | 2025-09-15 |

Best Practices:
- Keep column headers short and clear (e.g., BatchID, not Batch Identifier).
- Match column names exactly with merge tags you’ll use in templates.
- Normalize data (consistent date formats, standardized text for “None” vs. “N/A”).
- Avoid blank cells—use placeholders like “None” or “Pending.”
Step 3: Build Your Templates in Word or Google Docs
Purpose: Standardize your manufacturing reports with reusable templates and placeholders.
Inspection Report Template
| Inspection Report ——————- Batch ID: {BatchID} Machine ID: {MachineID} Inspector: {InspectorName} Date: {InspectionDate} Issues Found: {IssuesFound} Supervisor: {Supervisor} |
Work Order Template
| Work Order ——————- Work Order ID: {WorkOrderID} Related Batch: {BatchID} Assigned Supervisor: {Supervisor} Next Service Date: {NextServiceDate} Notes: {IssuesFound} |
Safety Checklist Template
| Safety Checklist ——————- Machine: {MachineID} Inspector: {InspectorName} Date: {InspectionDate} Observations: {IssuesFound} Signed by: {Supervisor} |
Template Rules:
- Always use {CurlyBraces} for merge tags.
- Align tag names with Google Sheet column headers.
- Add company logos, regulatory notes, or standard disclaimers.
- Keep formatting simple and clean for compliance readability.
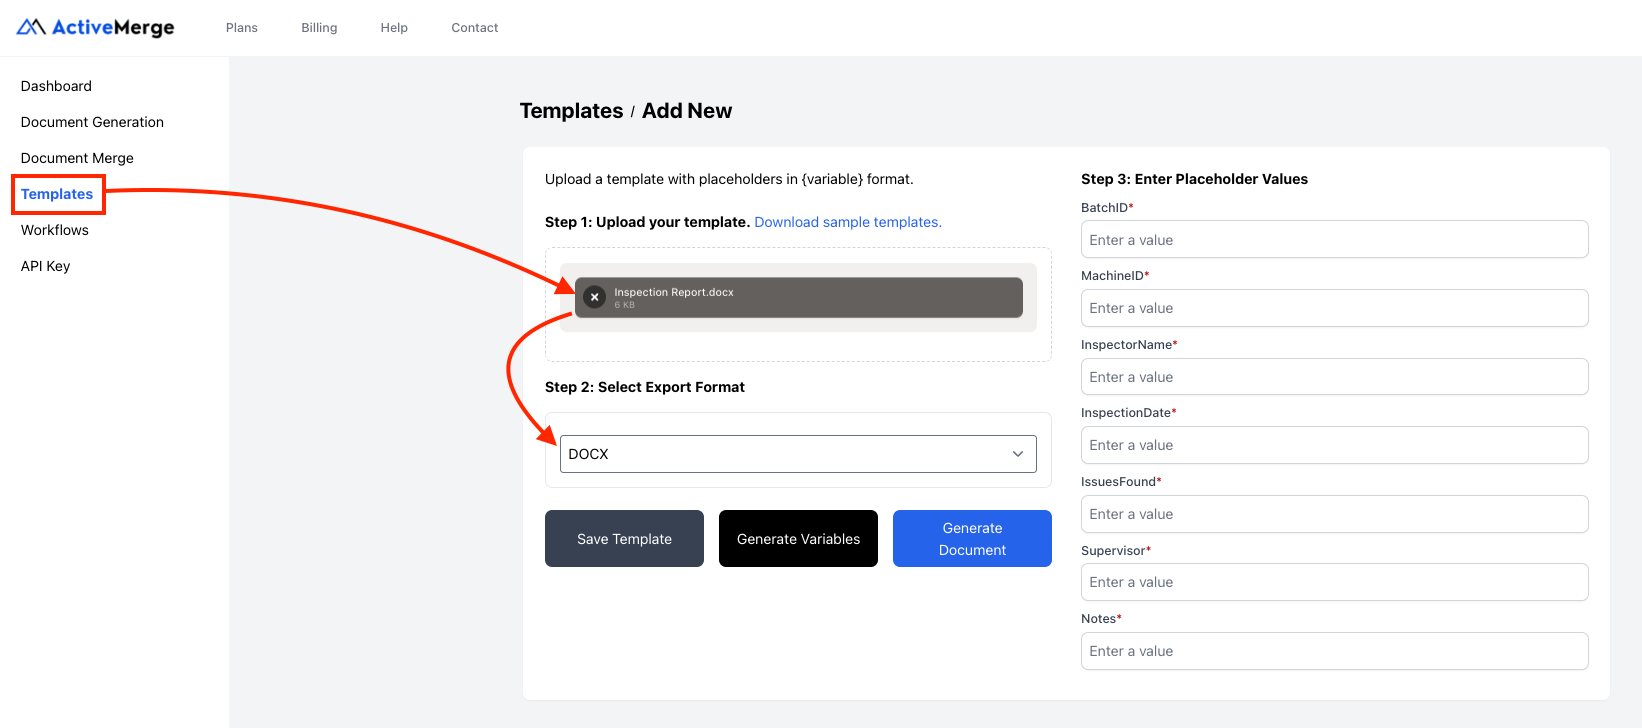
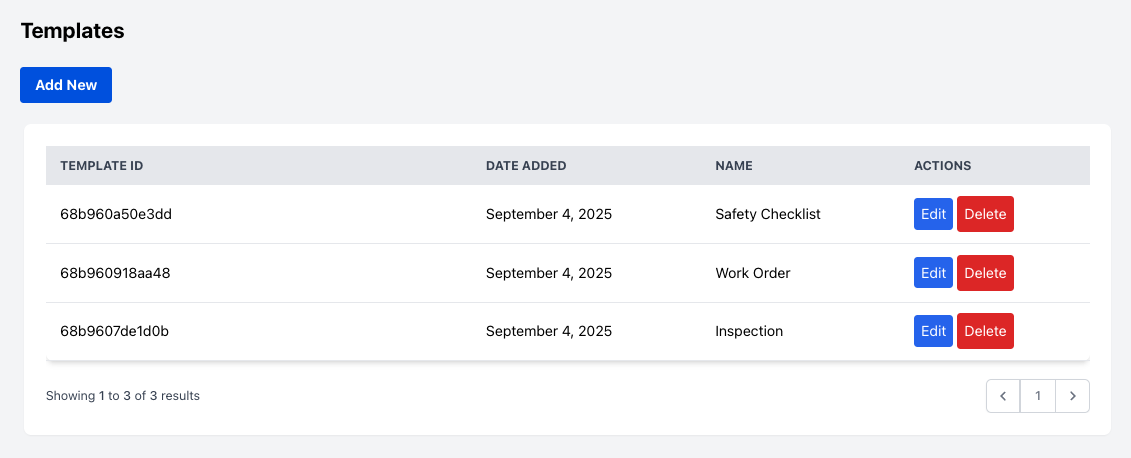
Step 4: Upload Templates to Active Merge
Steps:
- Go to Templates → Add Template.
- Upload your Word templates (Inspection, Work Order, Safety Checklist).
- Review detected merge tags to confirm correct mapping.
- Save each template with a clear version number (e.g., Inspection_v1, WorkOrder_v1).
Best Practice: Keep a version history to track template updates, especially for compliance changes.
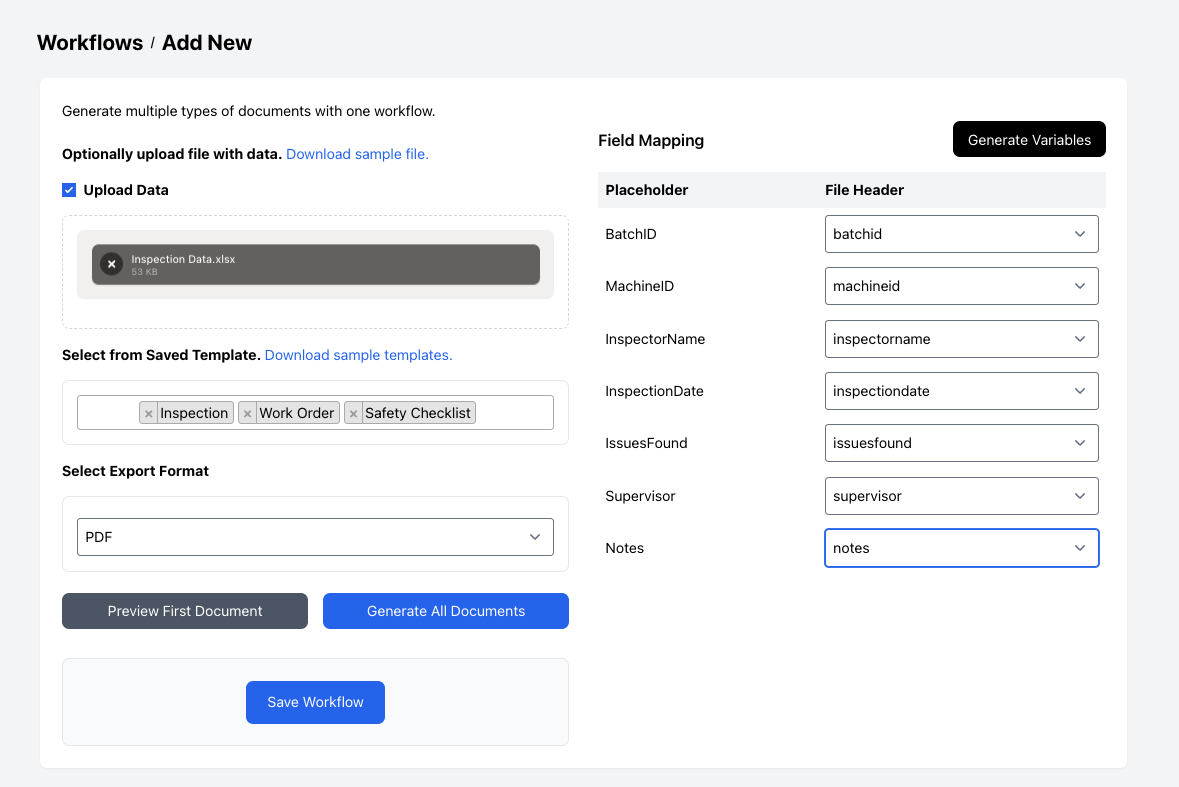
Step 5: Build a Multi-Document Workflow
Purpose: Generate multiple manufacturing reports at once, using a single automated process.
- Go to Workflows → Add New.
- This is where you’ll define a workflow that bundles together all the documents (e.g., Inspection Report, Work Order, Safety Checklist).
- Click “Generate multiple types of documents with one workflow.”
- Workflows let you build and run multi-document packs in a single step.
- Optionally upload a file with data.
- If you’re using Google Sheets or a CSV/XLSX export from your MES/ERP, upload it here.
- You can also Download a sample file to see the expected format before preparing your data.
- Upload Data.
- Your uploaded file provides the Batch IDs, Machine IDs, inspector details, and other variables that Active Merge will merge into templates.
- Select from Saved Templates.
- Choose the templates you created earlier (e.g., InspectionReport_v1, WorkOrder_v1, SafetyChecklist_v1).
- You can also Download sample templates to see pre-built examples for testing.

- Select Export Format.
- PDF for compliance-ready documents that can’t be altered.
- Original (Word) if you want the option to edit before finalizing.
- Save Workflow or Start Field Mapping.
- Once saved, your workflow is ready to run whenever you upload fresh inspection or batch data.
Pro Tip: Create different workflows for recurring needs—such as “Daily Machine Inspections” vs. “Monthly Compliance Reports.” This keeps your files organized and makes it easy to run the right set of documents at the right time.
Step 6: Connect Your Data Source and Finalize Field Mapping
Purpose: Ensure your workflow pulls the correct data for all your templates and is ready for bulk generation.
- Review Field Mapping
After setting up your multi-document workflow in Step 5, Active Merge will show a Field Mapping screen. This lists all placeholders from your templates alongside the corresponding columns from your data source:
| Placeholder | File Header |
| {BatchID} | BatchID |
| {MachineID} | MachineID |
| {InspectorName} | Inspector |
| {InspectionDate} | Inspection Date |
| {IssuesFound} | Issues Found |
| {Supervisor} | Supervisor |
Make sure each placeholder is matched to the correct column. You can adjust mappings here if needed.
- Connect Your Data Source
Choose the source for your workflow data:
- Google Sheets: Upload your spreadsheet or connect directly via the Google Sheets integration. Active Merge will use the mapped columns to fill templates.
- ERP/MES Integration (Optional): Use Zapier or API to automatically push inspection, maintenance, or production data into Active Merge. Workflows can be triggered automatically when new records are added.
Step 7: Preview and Generate All Documents
Purpose: Verify your data merges correctly and generate bulk documents.
- Preview a Single Record
- Select one row from your data source.
- Click Preview to see how the information populates your templates.
- Check fields such as Batch ID, Inspector Name, Issues Found, and Supervisor assignment.
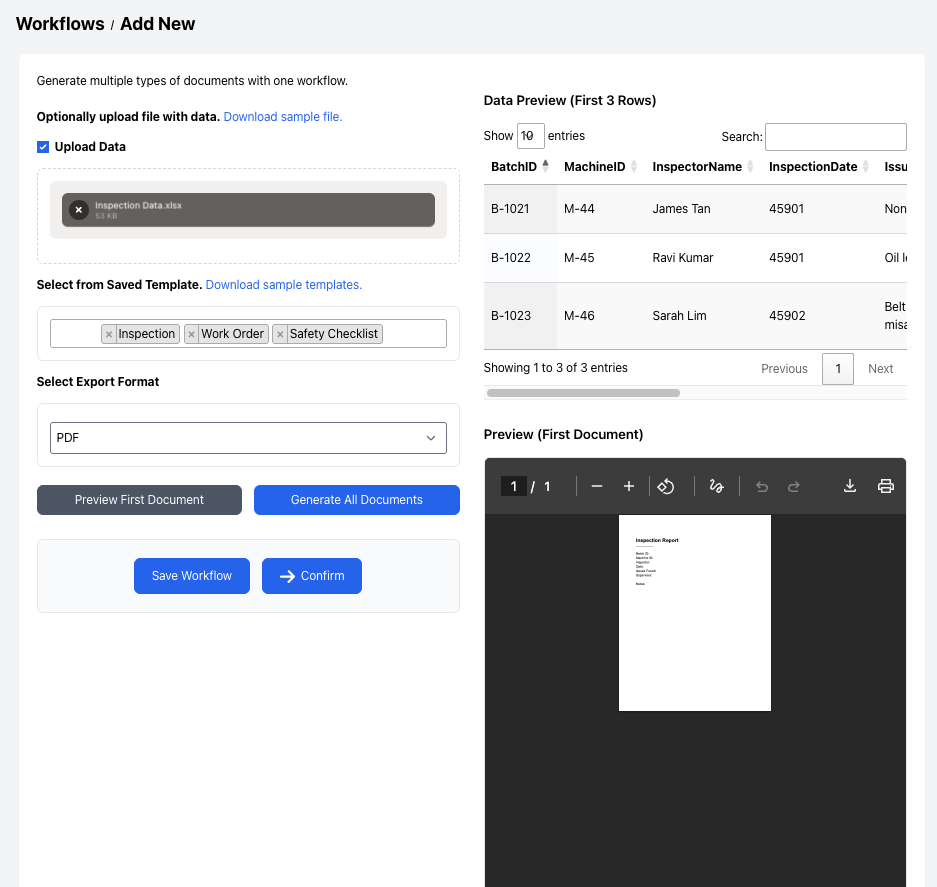
- Generate All Documents in Bulk
- Once satisfied with the preview, click Generate All Documents.
- Active Merge will create PDFs (or Word files if selected) for every row in your dataset and bundle them in a ZIP file if needed.
Best Practice: Always run a test preview with sample data to catch formatting or mapping errors before generating the full batch.
Step 8: Automate Delivery & Storage
Purpose: Ensure generated reports are delivered and archived automatically.
- Cloud Storage: Save reports in Google Drive, Dropbox, or OneDrive, organized by Batch ID or Inspection Date.
- Email Delivery: Send completed reports to supervisors, compliance officers, or plant managers automatically.
- Internal Notifications: Trigger alerts in Slack or Microsoft Teams when new reports are ready for review.


Final Thoughts
In manufacturing, documentation is not optional—it’s the backbone of compliance, safety, and quality. But manual reporting wastes time and risks errors.
By using Active Merge Workflows, you can:
- Generate inspection reports, work orders, and safety checklists automatically.
- Ensure every document is accurate, branded, and compliant.
- Deliver and archive reports without lifting a finger.
Automation frees supervisors and technicians from paperwork so they can focus on production, safety, and continuous improvement.
Real-World Use Cases
- Quality Assurance: Generate inspection reports for every production batch automatically.
- Maintenance Teams: Create work orders instantly when an inspection flags issues.
- Compliance: Archive safety checklists for audit readiness with zero manual effort.
- Operations Management: Deliver daily machine performance reports to supervisors automatically.
Frequently Asked Questions
- Can workflows generate different documents for different machines?
Yes. You can create separate workflows per machine, or use conditional logic via Zapier/ERP integration to assign specific templates.
- What file formats are supported?
Documents are generated as PDFs by default, but you can also export to Word (.docx) if further editing is needed.
- Can I automate report delivery to compliance officers?
Absolutely. Active Merge integrates with email and cloud storage systems, ensuring reports are automatically delivered and archived for audits.
- How do I handle recurring inspections?
Set up a recurring workflow using Google Sheets. As soon as new rows (inspections) are added, they can be merged into documents and stored automatically.
- How do I update templates without breaking existing workflows?
Always maintain version control by saving updates as a new version (e.g., Inspection_v2). Workflows can continue using older versions until you’re ready to switch, ensuring existing automation isn’t disrupted.

