
Manually generating and sending invoices can quickly become overwhelming—especially if you’re managing billing for dozens or even hundreds of clients. Between copying data into templates, exporting files, and emailing each invoice one by one, the process is repetitive, error-prone, and time-consuming.
- I Who This Tutorial Is For
- II What You’ll Learn
-
III
Step-by-Step: Create and Send Invoices with Active Merge
- III.I Step 1: Sign Up for Active Merge
- III.II Step 2: Create Your Invoice Template in Google Docs
- III.III Step 3: Upload the Template to Active Merge
- III.IV Step 4: Prepare Your Billing Spreadsheet in Google Sheets
- III.V Step 5: Generate Your API Key from Active Merge
- III.VI Step 6: Create a Zap in Zapier to Generate Invoices
- III.VII Step 7 (Optional): Save Each Invoice to Google Drive
- III.VIII Step 8: Automatically Email the Invoice to Each Client
- III.IX Step 9: Turn on Your Automation
- IV Benefits of Invoice Automation with Active Merge
That’s where document automation with Active Merge comes in. With just a spreadsheet and a one-time setup, you can automatically generate personalized invoice documents and email them to your clients—without manually editing a single file.
In this guide, we’ll walk you through every step of the process. By the end, you’ll be able to auto-generate professional invoices in bulk and deliver them to clients in minutes using Google Sheets, Active Merge, and Zapier.
Who This Tutorial Is For
This workflow is designed for anyone who regularly creates and sends invoices, including:
- Freelancers and independent contractors managing multiple clients
- Small businesses with recurring or one-off billing needs
- Bookkeepers and accounting firms handling invoicing for clientsAgencies and service-based businesses charging retainers or hourly work
- SaaS or subscription businesses issuing monthly payment requests
If you’re still creating invoices manually in Word or Excel, this setup will save you hours of tedious work—every single month.
What You’ll Learn
- How to create a reusable invoice template with dynamic fields
- How to organize your invoice data in a Google Sheets spreadsheet
- How to connect your template and data using Active Merge
- How to build an automated Zap in Zapier that generates and emails invoices
Step-by-Step: Create and Send Invoices with Active Merge
This section walks you through the entire workflow for generating and emailing invoices automatically using Active Merge, Google Sheets, and Zapier. From preparing your invoice template to connecting your spreadsheet and setting up email delivery, each step is designed to eliminate manual work and streamline your billing process.
Step 1: Sign Up for Active Merge
Before you can start automating invoices, you’ll need an Active Merge account. This is where you’ll upload your invoice template, manage API keys, and connect integrations like Zapier.
Start by creating your account at https://activemerge.com. Registration is free and takes just a minute.
Once inside the platform, you’ll gain access to:
- A dashboard to manage your document templates
- API integration options (for Zapier, Make, WordPress, or custom workflows)
- File generation tracking and history
- Free tools and pre-made templates

Step 2: Create Your Invoice Template in Google Docs
Next, you’ll need to create a dynamic invoice template using Google Docs. Your invoice template is the foundation of this workflow. You’ll build it using merge fields (placeholders) that get replaced with actual client and payment data from your spreadsheet.
Start with a basic invoice layout that includes all the standard information you want to personalize, such as:
- Client name
- Invoice number
- Invoice date
- Description of services
- Amount due
- Due date
To make the document dynamic, wrap each variable in curly brackets. These will act as placeholders for actual values from your spreadsheet.
Sample Invoice Template:

Once your template is complete:
- Go to File > Download > Microsoft Word (.docx).
- Save the file to your computer. You’ll upload it to Active Merge in the next step.
If you don’t want to start from scratch, visit ActiveMerge’s Free Templates page and choose from available invoice formats.
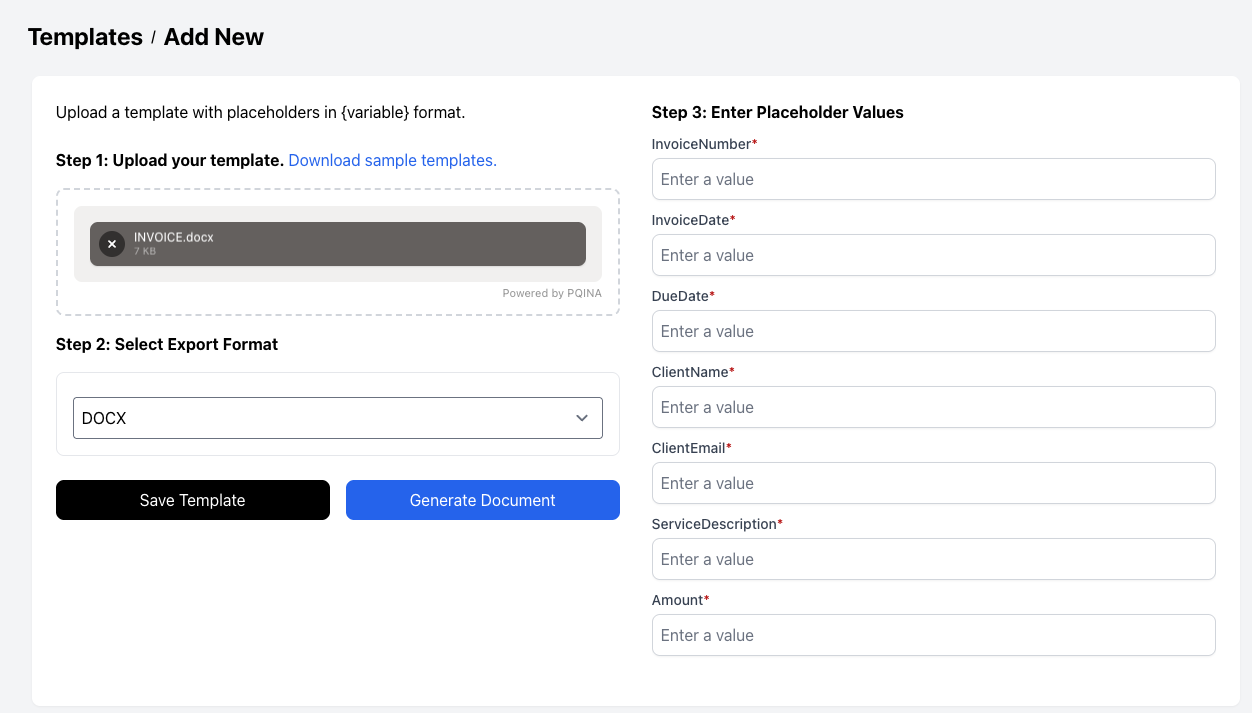
Step 3: Upload the Template to Active Merge
Once your invoice template is ready, upload it to Active Merge. The platform will detect your placeholders and prepare the template for automation.
- Log in to your Active Merge account.
- Navigate to the Templates tab.
- Click “Add Template” and upload the DOCX file you downloaded from Google Docs.
- Once uploaded, Active Merge will detect all dynamic placeholders automatically.
- Confirm each placeholder and name your template (e.g., “Client Invoice – Monthly”).
- Save the template.
This template will now be available for use in automated workflows.
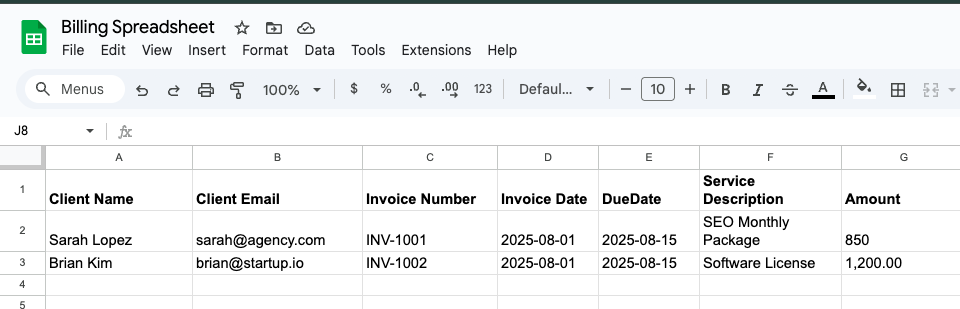
Step 4: Prepare Your Billing Spreadsheet in Google Sheets
Google Sheets will act as your invoice data source. Set it up with columns that match the placeholders in your template—each row will generate a unique invoice.
Your spreadsheet should contain a row for each invoice, with columns that match the placeholder names from your template exactly (including capitalization and spacing).
Example Column Headers:
- Each row represents one client invoice.
- Add as many rows as needed—the automation will process each row individually.
Step 5: Generate Your API Key from Active Merge
To automate document generation, you need to link Active Merge to Zapier. This secure API key connection allows Zapier to access your invoice template and generate documents automatically.
To authorize Active Merge in Zapier, you’ll need an API key.
- Go to your Active Merge dashboard.
- Click on “API Keys” from the sidebar.
- Select “Generate New API Key”.
- Copy and securely store the key—you’ll use it in Zapier shortly.

Step 6: Create a Zap in Zapier to Generate Invoices
This is where automation comes together. You’ll set Google Sheets as the trigger and Active Merge as the action. Whenever a new row is added to your spreadsheet, a personalized invoice is generated instantly.
You’ll now create a Zap in Zapier that watches your spreadsheet and creates an invoice when a new row is added.
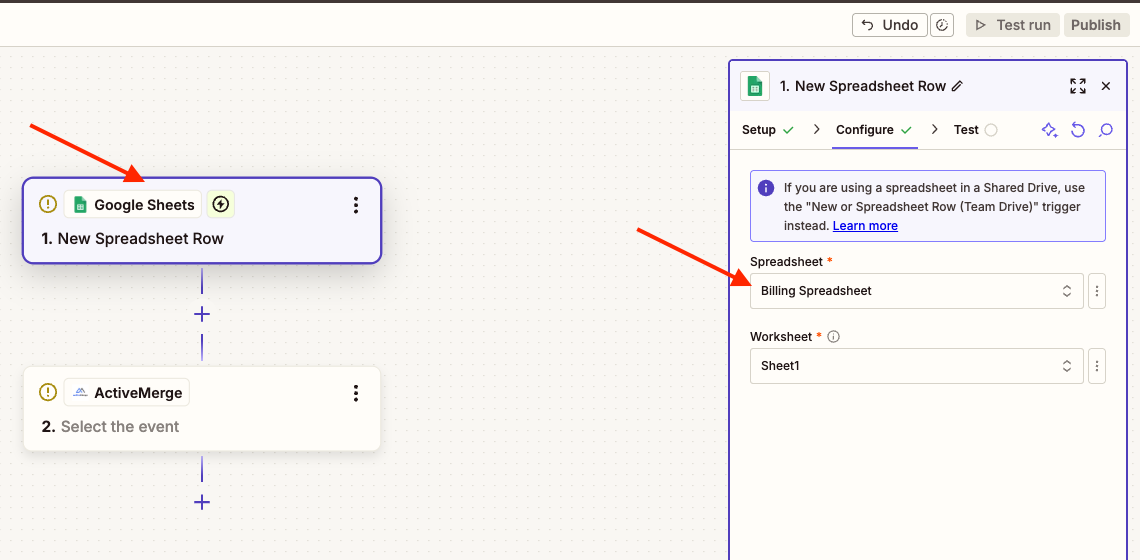
Trigger Setup: Google Sheets
- App: Google Sheets
- Event: New Spreadsheet Row
- Connect your Google Account and grant permissions.
- Select your spreadsheet and the specific worksheet with invoice data.
- Test this step to make sure Zapier can pull a sample row. The sample data should match a row in your spreadsheet.
Action Setup: Active Merge
- App: Active Merge
- Event: Generate Document
- Connect your Active Merge account by entering your API key.
- Choose the uploaded template from earlier (e.g., “Client Invoice – Monthly”).
- Set document format: PDF is the best choice for invoices.
- Map your placeholders to spreadsheet columns:
| {ClientName} → ClientName {InvoiceNumber} → InvoiceNumber {InvoiceDate} → InvoiceDate {DueDate} → DueDate {ServiceDescription} → ServiceDescription {Amount} → Amount |
- Run a test to generate a sample invoice and confirm the formatting looks correct.

Step 7 (Optional): Save Each Invoice to Google Drive
If you want to back up all invoices, you can add an extra step to save each generated file to a designated Google Drive folder for easy access and record-keeping.
To automatically back up invoices:
- Add a second action in your Zap.
- App: Google Drive
- Event: Upload File
- File: Use the file link returned from Active Merge
- Choose folder: For example, /Invoices/2025/August
This ensures every generated invoice is saved securely to your Google Drive account for record-keeping.
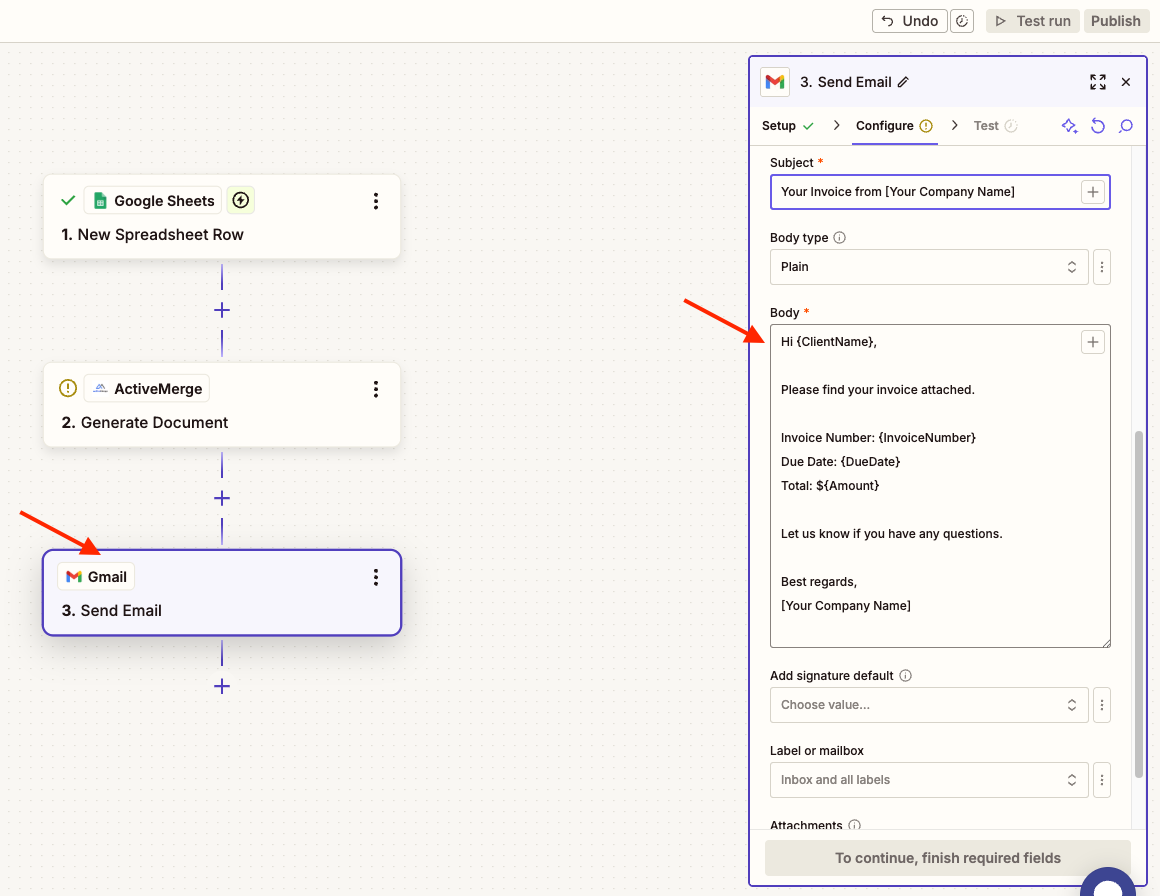
Step 8: Automatically Email the Invoice to Each Client
Finally, use Zapier to send the invoice directly to the client’s email. You’ll map the recipient’s email from your spreadsheet and attach the invoice as a PDF.
To deliver the invoice via email:
- Add a third action in your Zap.
- App: Gmail (or another email service)
- Event: Send Email
- To: Select ClientEmail from the spreadsheet
- Subject: “Your Invoice from [Your Company Name]”
Body:
| Hi {ClientName}, Please find your invoice attached. Invoice Number: {InvoiceNumber} Due Date: {DueDate} Total: ${Amount} Let us know if you have any questions. Best regards, [Your Company Name] |
- Attach: Use the file URL or file object from the Active Merge step.
Test the email delivery to make sure the attachment is working and the content is correct.
Step 9: Turn on Your Automation
Once everything is tested and working, publish your Zap. Your invoicing process is now fully automated—every new row in your spreadsheet triggers an invoice and sends it without any manual input.
Once all steps are tested successfully:
- Click “Publish” in Zapier.
- Your automation is now live.
Going forward, every time you add a new row to your billing spreadsheet, a new invoice will be generated and sent automatically.
Benefits of Invoice Automation with Active Merge
Manual invoicing—especially in bulk—can be time-consuming, error-prone, and difficult to track. Whether you’re a freelancer, bookkeeper, agency, or business with dozens of clients, generating invoices one at a time slows down your workflow and risks mistakes like missed due dates, duplicate billing, or inconsistent formatting.
Active Merge helps eliminate these problems by automating the entire invoice generation process. With just a few clicks, you can turn a structured spreadsheet into dozens (or hundreds) of fully customized invoices—complete with names, dates, line items, payment terms, and totals. No manual edits. No repetitive copying and pasting. Just clean, accurate invoices delivered instantly.
Here’s how Active Merge improves your invoicing workflow:
- Saves time: No need to edit templates or send emails manually
- Reduces errors: Avoids mistakes in names, dates, and amounts
- Scales easily: Works whether you’re sending 10 or 1,000 invoices
- Professional output: Consistent formatting and branding
- Easy to update: Adjust your spreadsheet anytime to change invoice data
Real-World Example
Use Case: Monthly Billing for a Design Agency
A boutique design agency with 45 clients set up this workflow to automate monthly billing. Each month, they update their spreadsheet with client details and billing amounts. With one click, invoices are generated and delivered—no editing, exporting, or manual emailing required.
Results:
- Reduced invoice prep time from 6 hours to 10 minutes
- Improved consistency in formatting and delivery
- No more missed or delayed invoices
Get Started Now with Active Merge!
Ready to eliminate manual invoice generation? Sign up for free at https://activemerge.com, upload your invoice template, and connect your data in minutes. Whether you invoice clients weekly, monthly, or on demand, this setup will give you back hours every billing cycle.

